Welcome to Lesson 3! Last week beginners learned to create a chain, work a chain, and stitch single crochet stitches. You should have your rectangle ready that will become your bow later on.
This week, beginners are going to learn to create a magic ring and work inside that magic ring. Advanced crocheters will be given the next pattern instructions for the body of the whale.
General Instructions | Beginners | Advanced
Let’s get started with a reminder of general crochet materials and terms for this project.
General Instructions
ch= Chain
sl st= slip stitch
sc= single crochet
hdc= half double crochet
dc= double crochet
tr= treble or triple crochet
inc= increase
• (two sc stitches in one stitch)
inv dec= invisible decrease
• (insert hook in front loop of sc, pull up a
loop, insert hook in front loop of next sc,
pull up a loop, yarn over and pull through
all three loops on hook)
picot= (ch 3, insert hook in third ch from hook, sl
st)
Rnd= round
• This item is worked in the round for the
body. (Mark the beginning stitch for each
round to keep track of where you are in
your work.)
BLO= back loop only
Magic Ring: This is a great way to make an
invisible and tight round.
US Terminology
Materials:
yarn in two colors (for beginners, see lesson 1 to choose a good yarn)
- Crochet Hook (Below I will tell you how to choose the correct hook for your project. It really depends on the type of yarn you choose and how you crochet.)
- Yarn Needle
- Fiberfill (I use Morning Glory brand)
- 9mm-12mm Safety Eyes (Choose the size
- eyes that fits your project)
- Stitch markers
- Black Embroidery Floss
- Yarn Guide / Finger guard
Beginner
Now that you have learned to crochet in a straight line, you are ready to learn how to crochet in the round. In amigurumi, you crochet in a continuous spiral. There is no joining at the end of the rounds. Patterns will tell you when they are crocheted in continuous rounds, and the abbreviation for each line of stitches will change from Row to Rnd.
This is what this week’s piece of the pattern looks like:
Note: When the pattern says 2sc, that means sc in the next 2 stitches. Inc is 2sc in the next (same) stitch. For example 4 sc, would be (sc in next stitch, sc in next stitch, sc in next stitch, sc in next stitch)
Note 2: Make sure you mark the stitch at the beginning of each round so that you can keep track of where you are in your work! This is where you will use those handy stitch markers that you bought for this project. You will only move the stitch marker when you are stitching a new first stitch of the round. So the first stitch of round three, you will move the marker from the first stitch of rnd 2 and place it in the first stitch of 3 when you are done crocheting it.
Using Color A, create a magic ring, ch1
Rnd 1: 6sc in the magic ring, pull tight
Rnd 2: inc in each stitch around [12] ***Mark first stitch in rnd
Rnd 3: (sc, inc) around [18]
Rnd 4: (2sc, inc) around [24]
Rnd 5: (3sc, inc) around [30]
Rnd 6: (4sc, inc) around [36]
Rnd 7: (5sc, inc) around [42]
Rnd 8: (6sc, inc) around [48]
Rnd 9-18: sc in each stitch around
This says Color A. For the Pattern, I wrote the body of the whale as Color A and the Bow and bottom of the whale as Color B. Make sure you are using the color that you did not use last week.
Now, you have to learn how to make a magic ring.
You will find a video here:
This is a tricky technique, and it will take you several times practicing it before you get it right. That’s okay! You are learning! If you need more help, there are a ton of videos on creating a magic ring on YouTube, so search one up. I will show you again how to do this in the live that follows this post.
This video also shows you how to work 6 sc in the MR.
The next thing you need to know is how to work the SC X Stitch. You can work this pattern using the sc stitch that you learned last week, but if you want to truly learn how to make tight amigurumi, you need to learn how to create the SC X stitch. It is basically like the standard sc stitch, but instead of YO you yarn under before bringing your yarn through the previous stitch.
Here is a video to help:
For this part of the project, if it says SC, you will use the sc x stitch instead.
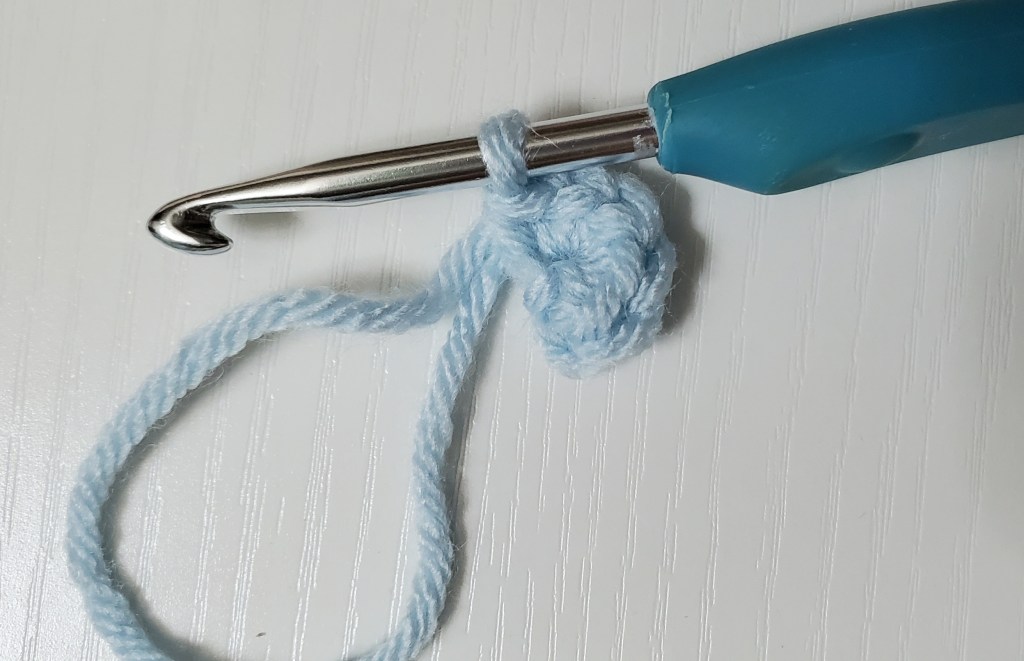
You will pull the end of your yarn to pull the MR tight. This will create a close circle. Your next stitch will go in the top of the first sc that you crochet in the MR. There is NO need to chain before doing so. Otherwise, you work the first sc of rnd 2 the same as you would any other sc st. Place marker in the top of the first sc of rnd two so that you can keep track of your place. Do NOT think you can just count as you do with rows. Continuous rnds gets confusing on the count. Trust me!
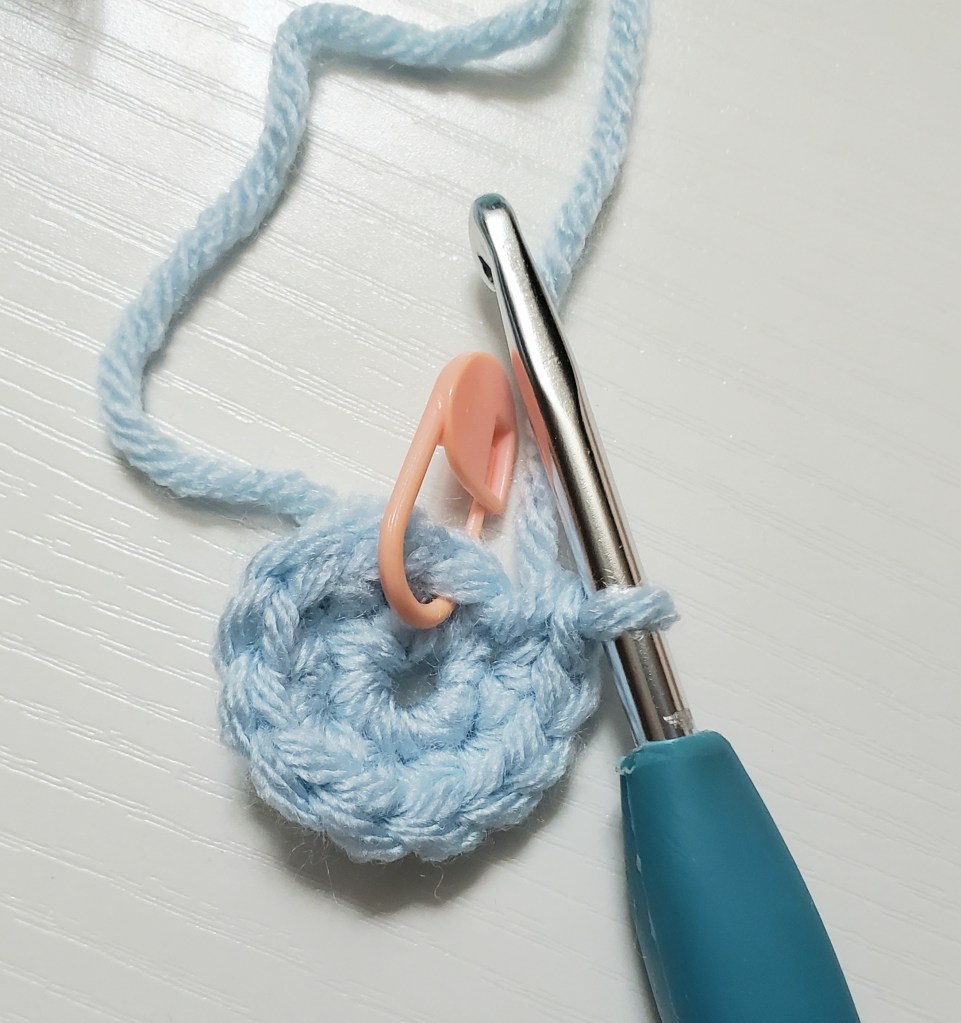
Rnd 2 you will work an inc in each st around. That means you will sc twice in each stitch from rnd 1. That means you are doubling the stitches from rnd 1. Rnd 1 you ended with 6 sc. Rnd 2 ends with 12sc. Increases are how you do just that…increase. This will grow our circle.
For Rnd 3, you will sc in the first stitch and increase in the second stitch. You will repeat this around until you end up with an inc in the last stitch of the round. This will increase your number of stitches to 18sc.
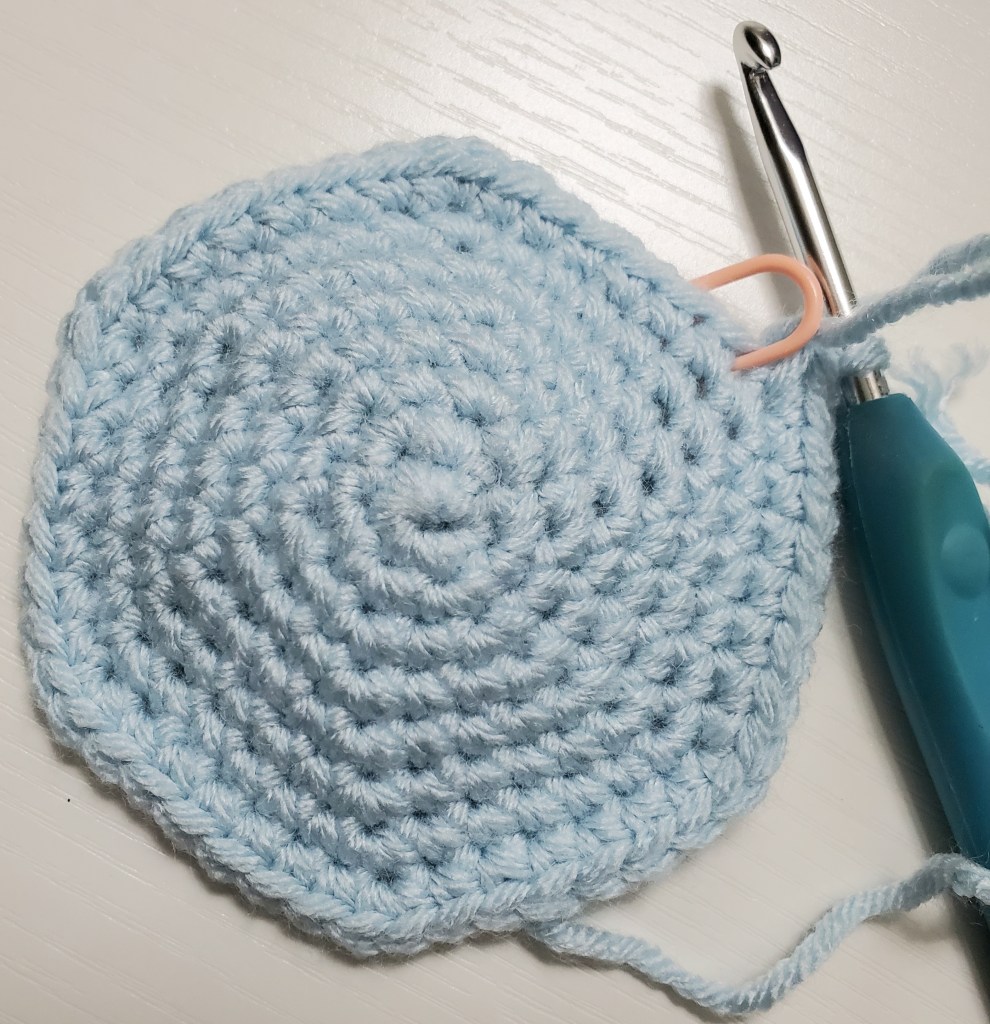
You will continue to grow your circle until you reach Rnd 9. Then the added rows of the same size will create a dome shape.
How should you keep track of what rnd you are on? The best way is to write down all the rnd numbers and strike a line through it when you complete it. So, when you complete rnd1, strike a line through that number. When I print out patterns, I check off the bit of instruction as soon as I complete it. That way, I always know where I am in the project.
Once you get to Rnd 18, stop for this week. Do NOT cut your yarn yet. This is enough for you to practice this week.
Here’s what your project should look like at this point:

Homework
Well, it is that time of the week again!
- Practice creating a MR over and over until you feel comfortable doing it.
- Pactice working 6sc over and over in the MR until you feel comfortable.
- Complete the pattern to Rnd 18
- Watch the Instagram Live for this week, will be filmed at 7pm, 10 August 2022.
- Ask questions
- Fell proud of what you have accomplished for this week!
Advanced
Note: When the pattern says 2sc, that means sc in the next 2 stitches. Inc is 2sc in the next (same) stitch. For example 4 sc, would be (sc in next stitch, sc in next stitch, sc in next stitch, sc in next stitch)
Note 2: Make sure you mark the stitch at the beginning of each round so that you can keep track of where you are in your work!
Note 3: When this part of the pattern says sc, it means to use the sc x stitch.
Using Color A (color that is not the bow), create a magic ring (see video), ch1
Rnd 1: 6sc in the magic ring, pull tight
Rnd 2: inc in each stitch around [12] ***Mark first stitch in rnd
Rnd 3: (sc, inc) around [18]
Rnd 4: (2sc, inc) around [24]
Rnd 5: (3sc, inc) around [30]
Rnd 6: (4sc, inc) around [36]
Rnd 7: (5sc, inc) around [42]
Rnd 8: (6sc, inc) around [48]
Rnd 9-18: sc in each stitch around
Do NOT cut yarn yet! That’s it for this week!
